前言
StrongFriends,又称壮壮朋友(๑•̀ㅂ•́)و✧,是我开发的一个举铁爱好者论坛。主要功能包括:发帖、评论、赞踩、私信、RM 计算器、维京系数计算器、力量排行榜、帖子 / 评论 / 用户管理。
前端:BootStraps 后端:SpringBoot / Mybatis DB: MySQL / Redis
以下是个人在实现一些重点功能所做的笔记。
Spring 接收参数的几种方式
1. 通过 @RequestParam 获取请求参数
用注解@RequestParam绑定请求参数 param 到变量 testParam,当请求参数 param 不存在时会有异常发生,可以通过设置属性 required=false 解决,例如 @RequestParam(value="a", required=false)。
1 | (value = "/test", method = RequestMethod.GET, RequestMethod.POST) |
2. 通过 @PathVariable 获取请求参数
1 | (value = "/test/{parm}", method = RequestMethod.GET, RequestMethod.POST) |
PS:使用 @RequestParam 时,URL 是这样的:http://localhost:8080/path?参数名=参数值
使用 @PathVariable 时,URL是这样的:http://localhost:8080/path/参数值
3. 通过 HttpServletRequest 获取前端发送 JSON 数据
前端示例代码:
1 | <script> |
使用 HttpServletRequest 获取 JSON :
1 | (value = "/test", method = RequestMethod.GET, RequestMethod.POST) |
4. 通过 @ModelAttribute 将前端发送 JSON 数据映射成目标对象
JS 代码如 3 中所示
Param Class:
1 | public class Param { |
使用 @ModelAttribute 将 JSON 映射成目标对象:
1 | (value = "/test", method = RequestMethod.GET, RequestMethod.POST) |
图片上传与读取
图片上传:前端通过 formData 将图片以 POST 请求方式发送给后端,后端使用 MultipartFile file 接收传来的二进制流,然后通过将文件名通过 UUID.randomUUID() 赋为唯一 ID 后直接保存到本地硬盘上。
注意 multipart/form-data 的请求头中的 Content-Type 与普通 POST 请求不同:
普通 POST 请求头中 Content-Type 字段值为:
1 | Content-Type: application/x-www-form-urlencoded |
multipart/form-data 请求头中 Content-Type 字段值为 multipart/form-data; boundary=xxxxxxx,这里的 xxxxxxx 可以自己定义,但要保证唯一:
1 | Content-Type: multipart/form-data; boundary=----WebKitFormBoundaryZp8W8sOi2HI0TBW7 |
普通 POST 请求的请求体格式为:
1 | param1=123¶m2=456¶m3=789 |
上传图片的 multipart/form-data 的 POST 请求体格式为:
1 | ------WebKitFormBoundaryjUVXJ3PslTEBh9as |
图片读取:后端接收到图片路径后,从硬盘上读取文件,再将文件流通过 HttpServletResponse response 返回。
具体做法是先设置 ContentType:
1 | response.setContentType("image"); |
然后通过 Spring 的 StreamUtils.copy() 读取到的文件流拷贝到 response 中,其中 IMAGE_PATH 即为图片的路径:
1 | StreamUtils.copy(new FileInputStream(new File(IMAGE_PATH)), response.getOutputStream()); |
用户登录与注销
登录
- 服务器校验密码,生成 token 关联 userId 并保存至数据库中,同时将 token 返回给客户端(浏览器中存储 Cookie )。
- 服务器生成 token 时还需要设置一个过期时间与状态,如果 token 到达过期时间就通过改变 token 状态来失效这个 token。
- 下次用户访问时浏览器 Cookie 中会带着这个 token,服务器会通过 token 来找到这个用户(所以 token 必须要是唯一的),并返回用户的具体信息。
- 注:token 可以是 session_id,也可以是 Cookie 中的任意一个 key,以下是几个重要方法。
1 | // 构造 Cookie 并加入 token 字段 |
注销
- 服务器端将 token 状态变为失效状态
- 清理 session
拦截器 (Interceptor) 的使用
Spring 中的拦截器主要分两种,一个是 MethodInterceptor,它拦截的是方法;一个是 HandlerInterceptor,它拦截的是请求地址,且比 MethodInterceptor 先执行。
实现一个 HandlerInterceptor 拦截器可以直接实现 HandlerInterceptor 接口,也可以继承 HandlerInterceptorAdapter 类,下面是实现接口:
1 | public class DemoInterceptor implements HandlerInterceptor { |
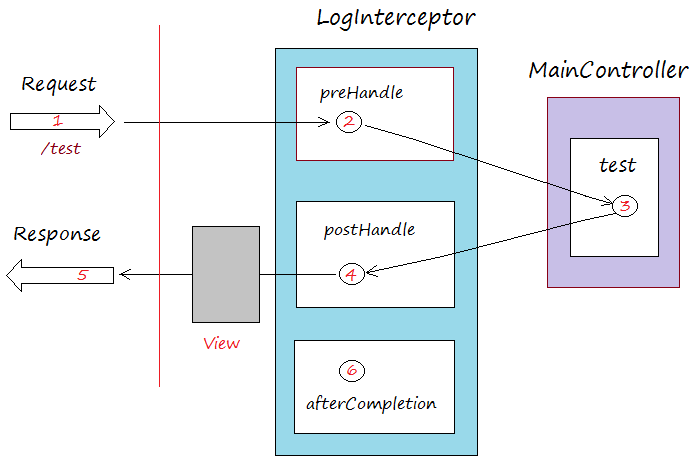
- preHandle:该方法将在请求处理之前进行调用。该方法的返回值为
Boolean类型,当返回为false时,表示请求结束,后续的Interceptor和Controller都不会再执行;当返回值为true时就会继续调用下一个Interceptor的preHandle方法,如果已经是最后一个Interceptor时候则会调用当前请求的Controller。 - postHandle:该方法将在请求处理之后进行调用,也就是
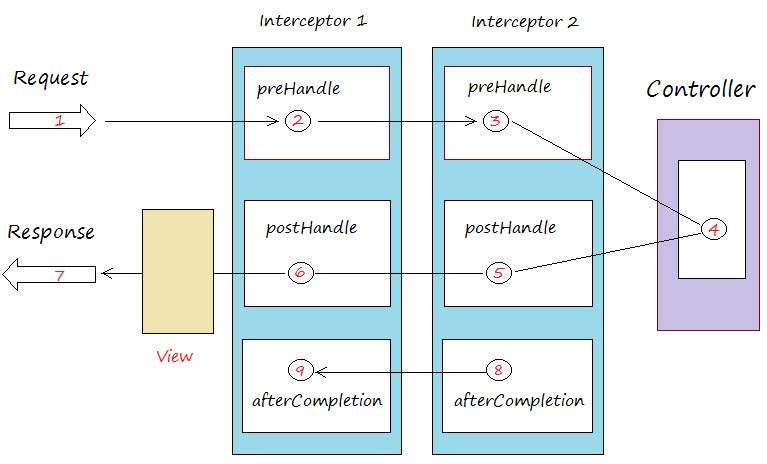
Controller调用之后执行,但它是在DispatcherServlet进行视图渲染之前被调用的,所以可以在这个方法中对Controller处理之后的ModelAndView对象进行操作(如下,我在这里面先加入了当前登录用户的信息)。postHandle方法被调用的方向跟preHandle是相反的,也就是说先声明的Interceptor的postHandle方法反而会后执行。 - afterCompletion:该方法也是需要当前对应的
Interceptor的preHandle方法的返回值为true时才会执行。该方法将在整个请求结束之后,也就是在DispatcherServlet渲染了对应的视图之后执行。这个方法的主要作用是用于进行资源清理工作。
搜相关资料时看到一篇国外的技术文章里讲的比较清晰:
prehandle – called before the actual handler is executed, but the view is not generated yet
postHandle – called after the handler is executed
afterCompletion – called after the complete request has finished and view was generated
实现用户登录拦截器
1 |
|
实现用户权限拦截器
1 |
|
注册拦截器
完成拦截器后就要把拦截器注册到 SpringMVC 中:
1 |
|
ThreadLocal 的使用
在拦截器中使用 ThreadLocal 主要是为了拿到当前的用户信息,并传递给后续的 Controller 中使用,将其封装成一个 HostHolder 以便使用。
1 |
|
多个拦截器的执行顺序
若有两个拦截器 Interceptor1 与 Interceptor2,则执行顺序如下:
1 |
|
Token / Cookie / Session 的区别
Token
- Token 是服务端生成的一串随机字符串,以在一定时间范围内标识用户的一个令牌
- 使用 Token 可以减轻服务器的压力,减少频繁查询数据库
Cookie
- 存储方式:Cookie 存储在客户端浏览器中
- 存储容量:有大小限制,不同浏览器的Cookie个数也有不同限制
- 存储方式:Cookie 中只能存储 ASCII 字符串
- 安全:Cookie 以明文存储,易被攻破进行 Cookie 欺骗,不安全
Session
- 存储方式:Session 存放在服务器端
- 存储容量:没有大小限制,服务器的内存大小有关
- 存储方式:Session 中能够存储任何类型的数据
- 安全:用户不可见,不存在泄漏风险,较安全
- Session 机制可以通过 Cookie 实现,但不一定是 Cookie
- 当做了负载均衡后,session 保存在某个服务器中,其他服务器是无法识别这个 session 的,除非多个服务器之间对 session 进行复制
PS:当浏览器禁用 Cookie 后,Session 与 Token 仍可以用,不过需要通过其他的方式来获取 Session 与 Token ,比如放在 URL 路径中,或者以表单形式提交给服务器端。
防止 XSS 攻击
在 Cookie 中设置 HttpOnly 属性
这样攻击者通过 JS 脚本将无法读取到 Cookie 信息。
1 | response.addHeader("Set-Cookie", "HttpOnly"); |
使用过滤器 (Filter) 将 HTML 进行转义
Filter 主要用于对用户请求进行预处理,也可以对 HttpServletResponse 进行后处理,是个典型的处理链。使用 Filter 完整的流程是:Filter 对用户请求进行预处理,接着将请求交给 Servlet 进行预处理并生成响应,最后 Filter 再对服务器响应进行后处理。
在 HttpServletRequest 到达 Servlet 之前,拦截用户的 HttpServletRequest。根据需要检查 HttpServletRequest,也可以修改 HttpServletRequest 头和数据。在 HttpServletResponse 到达客户端之前,拦截 HttpServletResponse。根据需要检查 HttpServletResponse,也可以修改 HttpServletResponse 头和数据。
下面是 Filter 在预防 XSS 攻击的应用:
- 实现
XssHttpServletRequestWrapper类,继承自HttpServletRequestWrapper,重写getParameter()和getParameterValues()方法,使用org.apache.commons.lang3下的StringEscapeUtils.escapeHtml4()方法对所有请求参数与 JSON 进行转义 - 实现
Fliter过滤所有请求,将HttpServletRequest强转为XssHttpServletRequestWrapper传递下去
拦截器与过滤器的区别
- 拦截器基于 JAVA 反射机制 (AOP),而过滤器基于函数回调 (doFilter)
- 拦截器不依赖于 Servlet 容器,过滤器依赖于 Servlet 容器
- 拦截器只能对 action 请求起作用,而过滤器则可以对几乎所有的请求起作用
- 拦截器可以访问 action 上下文、值栈里的对象,而过滤器不能访问
- 在 action 的生命周期中,拦截器可以多次被调用,而过滤器只能在容器初始化时被调用一次
执行顺序:过滤器 chain.doFilter() 前 -> 拦截器 preHandle() -> Controller - 拦截器 postHandle() -> 页面渲染 -> 拦截器 afterCompletion() -> 过滤器 chain.doFilter() 后
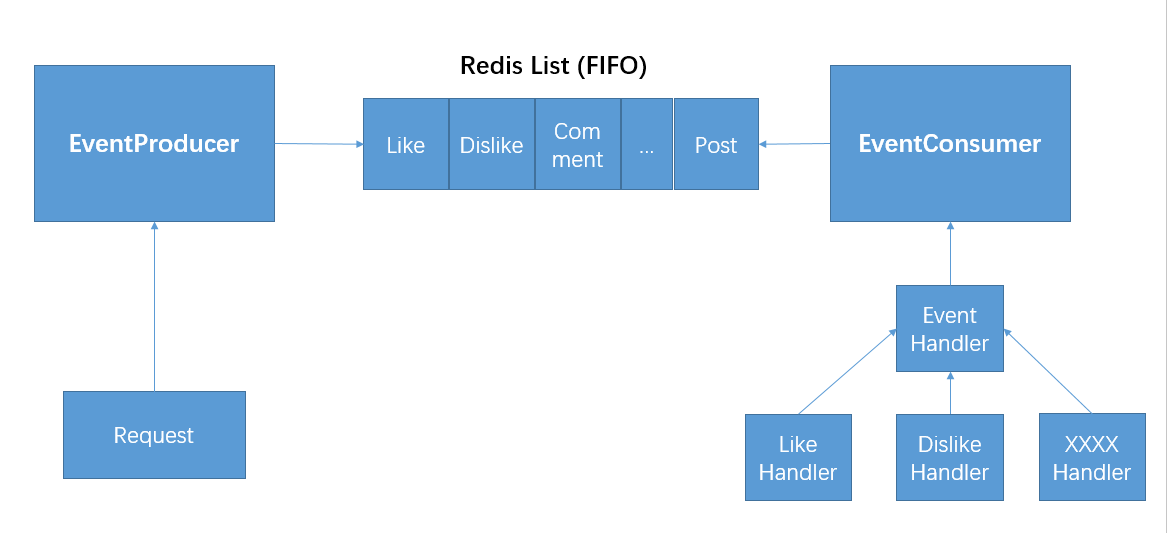
异步通用服务模块
这个模块的核心基于生产者-消费者模型,生产者通过向 MQ(由 Redis list 实现,是 FIFO 的)中 Push 需要处理的事件,然后消费者将事件 Pop 出来并通过线程池消费。
其中,生产者产生的事件是类型是多样的,消费者需要判断事件类型并调用对应的 Handler 处理。
首先定义 EventModel :
1 | public class EventModel { |
其中 EventType 为枚举:
1 | public enum EventType { |
再定义 EventHandler 接口,各类服务的 Handler 都需要实现这个接口:
1 |
|
接下来是生产者:
1 |
|
消费者:
1 |
|
总共有以下五种 Handler:
LikdHandler:Redis 读写 + 系统站内信通知(即私信)DislikeHandler:Redis 读写 + 系统站内信通知CommentlikeHandler:MySQL 与 Redis 读写 + 系统站内信通知MessageHandler:MySQL 写PostHandler:MySQL 写
杠铃轨迹识别
基于 Flask 搭建服务,具体实现基于 OpenCV 与 Dlib,流程如下:
- 用户上传视频文件,Spring Boot 端接收视频并保存,返回视频第一帧图片给浏览器
- 用户基于视频的第一帧图片框选杠铃位置,通过 JS 获得框选目标的起点坐标与矩形长宽,返回参数
- Spring Boot 接收参数,将参数作为 task Push 进 Redis 的 List 中 ,并将文件名、用户名、视频状态(此时为待处理)等保存至 MySQL 中。
- Flask 维护一个进程池,将 List 中的 task 弹出获得具体参数,处理视频。
- 处理完成,修改MySQL中的视频状态、处理结果。
防止 SQL 注入攻击
在 Mybatis 中尽量使用 #{} 而不是 ${},因为对于含有 #{} 的 SQL 语句,Mybatis 会通过 JDBC 中的 PreparedStatement 实现预编译,执行时直接使用编译后的 SQL,再用传入的参数替换掉占位符“?”。而${} 未经过预编译,存在 SQL 注入风险。
但是预编译也有一个缺点,就是不允许一个占位符“?”有多个值,在执行有IN子句查询的时候会将多个参数视作一个。例如:
1 | select * from user where id in ( 1 , 2 , 3) |
此时的 1 , 2, 3 将被整体视作一个参数,解决办法是 foreach,假设参数int[] ids = {1,2,3}:
1 | select * from user where id in |
使用 Redis 作为缓存
只在赞 / 踩与评论功能中使用了 Redis 作为缓存。
赞 / 踩
- 写:Redis
- 读:Redis
- 注:考虑到赞踩是热点数据,弱数据一致性,只需要将 Redis 缓存定时写入 MySQL 就好
- Redis 缓存定时写入 MySQL:使用
@EnableScheduling注解来开启定时任务 - 即使 Redis 崩了,也能从 MySQL 中恢复上一次的数据,且赞踩数据不是很重要
- 可以考虑读写分离提高性能
评论
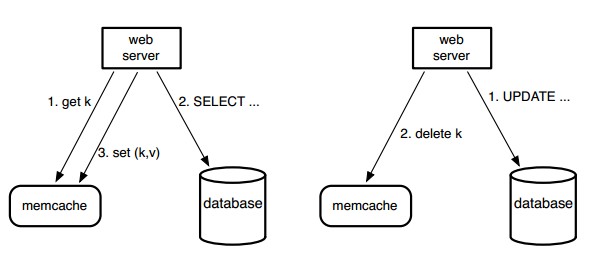
这部分参考了论文《Scaling Memcache at Facebook》 中的 Query cache 策略:
We rely on memcache to lighten the read load on our databases. In particular, we use memcache as a demand-filled look-aside cache as shown in Figure 1. When a web server needs data, it first requests the value from memcache by providing a string key. If the item addressed by that key is not cached, the web server retrieves the data from the database or other back-end service and populates the cache with the key-value pair. For write requests, the web server issues SQL statements to the database and then sends a delete request to memcache that invalidates any stale data. We choose to delete cached data instead of updating it because deletes are idempotent. Memcache is not the authoritative source of the data and is therefore allowed to evict cached data.
简单描述如下:
1.当一个 Web 服务器需要数据时,首先通过一个string key 来向 memcache 请求,如果没有拿到拿到这个 key 的缓存,就会从数据库或者从后台服务中找,再把找到的k-v对存到 memcache 中。
2.对于写的请求,Web 服务器会先发送 SQL 语句到数据库更新,接着发送删除请求到 memcache,失效旧的缓存。选择删除缓存的方式,而不是更新缓存的原因是删除是幂等运算。
我的实现是:
写:先写入MySQL,再删除 Redis 缓存(为了防止缓存删除失败,读到脏数据,还对每个 KEY 都设置了随机失效时间)
读:先读 Redis,若命中直接返回 Redis 数据;若没命中,读 MySQL 数据返回并写入 Redis 缓存
其他功能没采用 Redis 作为缓存的原因
- 考虑到私信使用频率不是很高,没有用 Redis 做缓存
- 考虑到如果用户上传的是视频,那么发帖也做缓存的话就会导致占用大量内存,此时用 Redis 做缓存就不是一个明智的选择。而且 Redis 的 Value 不能超过 512MB ,现在一般的视频都超过了这个大小。